Powerpc構架系統內核和內核模塊調試

[*] Include BDI-2000 user context switcher (有的系統直接提供了這個選項,它和BDI2000的PTBASE設置配合)
通過保存后,以上選項會生成如下配置選項:
CONFIG_DEBUG_KERNEL=y
CONFIG_DEBUG_INFO=y
CONFIG_FORCED_INLINING=y
CONFIG_BDI_SWITCH=y
值得關注的是PowerPC內核中CONFIG_BDI_SWITCH,它到底在內核中怎樣起作用的?
我們看arch/powerpc/kernel/head_32.S的關鍵代碼:
…
/* Load up the kernel Context */
2: bl load_up_mmu
#ifdef CONFIG_BDI_SWITCH
/* Add helper information for the Abatron bdiGDB debugger.
* We do this here because we know the mmu is disabled, and
* will be enabled for real in just a few instructions.
*/
lis r5, abatron_pteptrs@h
ori r5, r5, abatron_pteptrs@l
stw r5, 0xf0(r0)??? /* This much match your Abatron config */
lis r6, swapper_pg_dir@h
ori r6, r6, swapper_pg_dir@l
tophys(r5, r5)
stw r6, 0(r5)
#endif /* CONFIG_BDI_SWITCH */
/* Now turn on the MMU for real! */
…
它在MMU真正時能之前先增加了BDI2000幫助信息。在arch/powerpc/kernel/head_32.S的最后通過abatron_pteptrs保留了8個自己的空間給BDI2000用于保存2個頁表指針,如下:
/* Room for two PTE pointers, usually the kernel and current user pointers
* to their respective root page table.
*/
abatron_pteptrs:
.space 8
通過以上的準備工作,就可以進行內核和模塊的調試了,內核調試步驟如下:
說明:下面的步驟中
8349E-mITX-GP> 表示BDI2000的命令行窗口
[root@newhost misc-modules]# 表示開發主機
DDD> 或GDB> 表示是開發主機上的DDD的調試窗口中
root@mpc8349emitxgp:~# 表示目標系統中
1. 獲取恰當的斷點設置位置:
[shyi@newhost pro50_mpc8349_kernel]$ cat System.map |grep start_kernel
c03b05dc T start_kernel #得到start_kernel的虛擬地址
2.設置斷點,加載內核,啟動DDD的連接
8349E-mITX-GP>reset
8349E-mITX-GP>halt
8349E-mITX-GP>bi 0xc03b05dc (這個值是由System.map中的start_kernel的地址而來的)
8349E-mITX-GP>go
- TARGET: stopped #提示系統進入斷點了
8349E-mITX-GP>info
Target CPU : MPC83xx (e300c1)
Target state : debug mode
Debug entry cause : instruction address breakpoint
Current PC : 0xc03b05dc
Current CR : 0x44044022
Current MSR : 0x00001032
Current LR : 0x00003438
8349E-mITX-GP>
# 這時串口可看打到打印信息如:
Uncompressing Kernel Image ... OK
Booting using the fdt at 0xc00000
Loading Device Tree to 007fc000, end 007fefff ... OK
圖形系統中啟動DDD
[root@newhost scull]# cd /opt/pro50/montavista/pro/devkit/ppc/83xx/target/root/examples/misc-Modules
[root@newhost misc-modules]# ddd --debugger ppc_83xx-gdb –gdb /home/shyi/workspace/pro50_mpc8349_kernel/vmlinux
(gdb)target remote 192.168.7.64:2001 (其中192.168.7.64:2001為BDI2000的IP和調試端口)
8349E-mITX-GP>ci
8349E-mITX-GP>break soft #改變為軟斷點方式
這時候可以在DDD>圖形界面里面最右邊點擊鼠標右鍵來設置斷點,如圖:
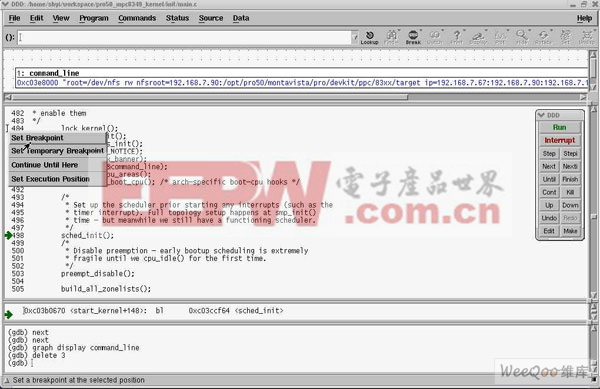
(注意:系統有些地方不能停住,需要在合適的位置來設置斷點)
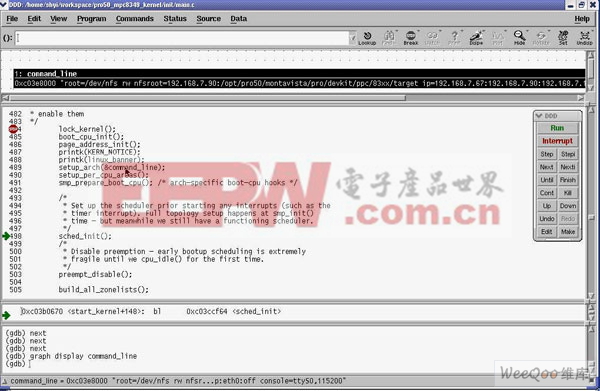
(gdb)cont
這時候系統就會停止在斷點設置的地方,接下來就可以進行內核斷點調試了,如下圖:
4.內核模塊的調試
使用LDD3的jit.c模塊進行調試的演示,DDD(或者說GDB)GDB的初始化腳本放置在~/.gdbinit:
其中.gdbinit的內容如下:
define lsmod
printf AddressttModulen
set $m=(struct list_head *)modules
set $done=0
while ( !$done )
# list_head is 4-bytes into struct module
set $mp=(struct module *)((char *)$m->next - (char *)4)
printf 0x%08Xt%sn, $mp, $mp->name
if ($mp->list->next == modules)
set $done=1
end
set $m=$m->next
end
end
define addmodulesymbols
set $myModule=(struct module*) $arg0
set $myAddr=$myModule->module_core
add-symbol-file $arg1 $myAddr
end
document addmodulesymbols
Adds the symbols for a module to the kernel.equires two parameters:
addmodulesymbols 0xAddress> .ko-file>
end
(說明: 定義了lsmod和addmodulesymbols 2個宏,并且定義了addmodulesymbols的幫助文檔)
內核模塊調試前面的步驟和內核調試完全一致,先要在start_kernel的地方設置斷點,然后讓內核能進行調試,接下來:
# 按DDD的
在內核起來之后→
root@mpc8349emitxgp:~# cd /root/examples/misc-modules


評論